

For many years one of our favorite antennas, and our go-to antenna for on-the-road OTA, was the venerable Silver Sensor. It’s on the compact side and has an interesting reception pattern – it’s somewhat directional and rejects signals from the back, but has a rather wide reception from the front. We had one since the early 2000s and for a time it was even mast-mounted outdoors, serving as a household main antenna for a DIRECTV TiVo HR10-250 beta unit. More recently its been on trips throughout California, Nevada and Arizona to tangle with ATSC 3.0 emissions.
For more details on the Silver Sensor take check out http://hdtvprimer.com/antennas/silver.html at HDTV Primer.
Alas, we sent the Sensor (along with a laptop and Airwavz RedZone Receiver) out on an ATSC 3.0 fishing expedition to Texas and Florida last year. Somewhere in Florida it went AWOL. Along with the laptop and RedZone Receiver – but the most tears were shed over the Sensor (and the loss of an ATSC 3.0 capture from Austin, which had some peculiar properties… 😢).
Since then we’ve been scouring online sites for a Silver Sensor or one its cousins, such as the Philips PHDTV-1. We did find some “refurbished” PHDTV-1s, but its clear someone took out the antenna element (which is for all intents and purposes a Silver Sensor) and soldered some aluminum strips instead. It works, sort of…
Since we can’t seem to buy one, we figured what the heck – let’s build our own!
And while we’re at it, let’s try to make it disassemble into a more compact form for travel. The Sensor barely fit in our carry-on suitcase and we were always worried about the elements getting bent. (I’m sure the TSA X-Ray guys always wondered what the heck was in my suitcase!)
Cloning The Silver Sensor
If you want to follow along and make one yourself, here’s what you need:
-
- Sheet aluminum. We got a 24x36x0.019″ sheet from our local Home Depot.
- A 300 to 75 ohm balun.
- A 1/2″ x 1/2″ x 12″ square wood dowel. Or, optionally, 3-D print a boom spine and stand (files provided below).
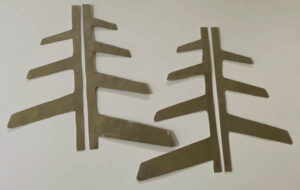
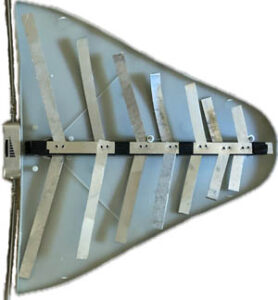
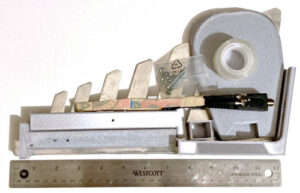
The main receiving elements of the Silver Sensor consists of two identical pieces of metal, one for the top and a flipped version for the bottom. Electrically speaking each piece contains antenna elements (those swept-back wing bits) and a central conductive boom linking the elements. Fortunately we bought a knock-off Philex Silver Sensor clone off of Amazon a few years ago. We traced out one of the metal pieces, and you can find links to the drawing as well as 3D model files below..
We recommend using a router to cut out the pattern. Alternately you can use tin snips like we did, but you’ll more than likely spend a lot of a time trying to flatten out the pieces afterwards.
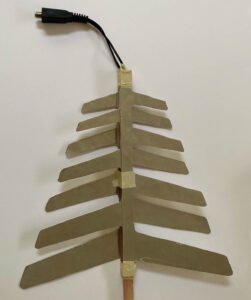
Once you have two pieces cut from the pattern, attach them to the wooden dowel.
Finally, attach the balun. The balun leads attach at the nose of the antenna – one to each metal piece.
At this point you have a functional antenna!
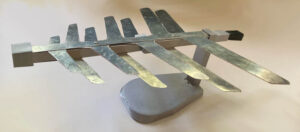
To make things more compact when disassembled we split each metal piece along the middle with the spine overlapping. And to improve aesthetics and have the RF connector at the tail (as in the original Silver Sensor) we 3D printed a hollow boom. The balun and RF connector are at the back of the antenna with the balun leads running up the spine to the nose, where they attach to the top and bottom plates.
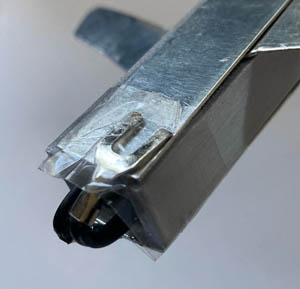
If you forgo the hollow spine and use a wooden dowel, take note of how you run the coax. The Silver Sensor has a “hot” (i.e. conductive) boom, and there’s some discussion as to whether coax from a balun should be routed along a boom, or whether it needs to drop below the antenna. See this post at https://www.w8ji.com/baluns_on_log_perodic_antennas.htm for more information.
So how does it work?
We used an HDHomerun Flex to measure signal strength on the Philex and our clone. You can see the results in the following table. When we first got the Philex we compared it to the genuine Silver Sensor and they performed more or less the same, with some small discrepancies on a few channels.
| RF Chan | Strength (dB) Philex | Strength (dB) Homebrew | Notes |
|---|---|---|---|
| 36 | 29 | 28 | Monument |
| 35 | 20 | 25 | Monument |
| 34 | 26 | 26 | |
| 33 | 26 | 24 | |
| 32 | 29 | 29 | |
| 31 | 30 | 30 | |
| 30 | 27 | 27 | |
| 29 | 29 | 29 | |
| 28 | 29 | 27 | |
| 27 | 22 | 23 | Intemittent drops |
| 23 | 19 | 19 | Monument |
| 22 | 19 | 16 | Monument |
| 21 | 15 | 15 | intermittent drops |
| 20 | 30 | 28 | |
| 19 | 19 | 21 | Monument |
| 14 | 0 | 0 | |
| 13 | 0 | 0 | |
| 12 | 0 | 0 | |
| 7 | 7 | 11 | ATSC 3 |
| 6 | bootstrap (intermittent) | bootstrap | ATSC 3 |
Overall the Philex and our clone perform similarly. There are small differences on a few channels. These may be due to slight position/rotation differences when the antennas were swapped.
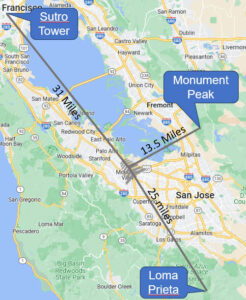 The signal strength reading were taken while the antennas were pointed at Sutro Tower, where most of the Bay Area emissions originate.
Surprisingly, some of the stations from Monument Peak came in rather well – its not clear if the antennas were getting a reflection. Not surprisingly (given that the Silver Sensor is a UHF-only design) we weren’t able to get any VHF channels – including the RF 7 ATSC 3.0 lighthouse, though the bootstrap was detected. Somewhat surprisingly the RF 6 ATSC 3.0 frankenstation’s bootstrap was also observed.
BYOC (Build Your Own Clone) Files
-
- Template for top and bottom elements. Cut these out of aluminum sheets. The spine should measure 305 mm.
- Left boom STL file. The boom was too long to print as a single piece so is split between a left and right piece. They can be connected using a screw.
- Right boom STL file.
- Base top STL file.
- Base bottom STL file. The base bottom should be screwed to the bottom of the base top. Depending on your printer you may need to sand/scrape the area the mast slides into.
- Stand Mast STL file. Once the base top/bottom are screwed together the stand mast should slide in from the rear.
- Nose cap STL file.
If you decide to build your own clone drop us a note – we’d love to hear how it goes!
And For Our Next Trick…
While we were working on this antenna we began to wonder…what would it take to create a VHF-High version tuned for RF channels 7 – 13 ? Well the LPDA calculator at https://hamwaves.com/lpda/en/index.html suggests we have 5 elements with the longest at 861 mm. The Silver Sensor’s longest element is 340 mm. The boom length would be about 350 mm vs the Silver Sensor’s ~300mm. In other words it’d be a bit more than twice as wide and just a little longer.
For grins, how about RF 6, which hosts a number of ATSC 3.0 Frankenstations? Well, we get a four-element antenna with the longest dipole at 1828 (!) mm, and a boom length of bout 600 mm. In other words, it’s big! But hey, we’re currently using a Winegard YA-7000c and can only receive the Bay Area RF 6 on a good day. So we might give it a try.