

This is the second post in the series on hard drive selection for DVRs. The first post talked a bit about the type of workload that a DVR imposes on the drives and went through some basic ways of measuring raw drive performance.
In this post we’ll take a look at the impact that the filesystem has on I/O performance, again with an emphasis on a DVR recording and playback workload. The filesystem is one of a few system components that we have some control over and that has a great impact on how the drive behaves. The I/O scheduler is another component that we’ll take a look at in a subsequent post.
From Software to Platter
In a simplistic world, software would read or write data to the drive and the drive would perform the reads or writes in that order. If we wanted to optimize for a certain type of workload, say for an eight-record / two-playback DVR, then it would be a matter of tuning the software.
Reality, unfortunately, isn’t so simple. Sitting between the DVR software and the platters are a number of layers, each of them trying to optimize performance in one way or another. Some of these layers are in the operating system, while others are in the drive itself. Drives often have caches, for example, and may reorder I/Os.
One of the challenges for us is that “optimal performance” can take on a variety of meanings. For example it could be all about getting the highest I/O operations/s (IOPS). Or it could be about getting the highest disk throughput in terms of bytes/s. Or it could be about guaranteeing low latency for all read and write requests.
To recap from the previous post, the “optimal performance” for our DVR is one that:
- Provides sufficient throughput to handle the desired number of simultaneous recordings and playbacks.
- Guarantees a certain latency. For recording, this guarantees that the record buffers won’t overflow and end up dropping data on the floor. For playback, this guarantees that once we start playback we won’t have to pause to wait for the drive to provide us data.
Two areas that we have some control over are the choice of filesystem and the I/O scheduler.
For the purposes of the tests run in this post, the deadline I/O scheduler is used. A future post will go into scheduler options and why the deadline scheduler is preferred.
As noted previously, the ideal configuration for a media drive in a DVR may not be the ideal configuration for the system drive, and we’re going to assume that we have a dedicated drive to hold our recordings.
The Filesystem
Several filesystems are available under Linux including ext2/3/4, xfs, reiserfs, and btrfs. Filesystems differ in how they go about managing disk space, organizing files and in the features they support. Btrfs for example was designed to support snapshots and pooling. It also checksums files to safeguard against bitrot of the media the files are stored on.
Some DVRs such as TiVo’s have custom filesystems specifically tailored to their needs While we could do the same, developing and maintaining such a filesystem is a non-trivial effort. So let’s take a look at what we can achieve with filesystems currently available.
We’ll take a look at ext4 and xfs, as both are widely used. In particular, we’ll examine how their handling of metadata and journaling affects performance.
Metadata
Linux filesystems tend to be comprised of two components – there’s the data you’re storing, and the metadata..
Filesystem metadata includes information about the filesystem structure, for example directory structures and which hard drive blocks belongs to which files, as well as information about individual files such as the file’s permissions, creation time, and size. How that metadata is organized and updated can have a profound impact on the performance of the filesystem.
Consider, for example, the file’s last access time. You generally don’t think that reading from a file will result in writes to the disk. However that’s exactly what happens if the filesystem needs to update the file’s last access time. Metadata accesses turn into hard drive accesses, with all the seek time and rotation latency penalty of a non-sequential I/O. So even though updating the last access time should only require writing a small amount of data, the time it takes can be substantial.
Metadata updates can interfere with recording and playback, and filesystems which perform frequent metadata updates, or which perform them in bursts, can severely impact our ability to have predictable throughput and latency.
Journaling
When a system halts ungracefully – whether due to a crash, a power outage, or other reasons – there’s a possibility that writes to the hard drive didn’t complete as expected. This can lead to inconsistency in the metadata and filesystem structure, corruption of data in files, or both. Journaling is a method of ensuring the filesystem integrity across unclean shutdowns.
Journals note what modifications a filesystem is about to make. When the system is restarted from a crash, the journal is consulted and any actions that were interrupted can be done (this is called “replaying” the journal). Of course any journal entries that didn’t make it onto the disk are lost.
Journaling also ensures that steps that must be performed together (atomically) actually are. Consider for example appending data to a file. Additional blocks may need to be allocated to the file (which involves taking blocks from the free space area and allocating them to the file), the file’s length needs to be updated, and the actual data needs to be written. The first two updates affect the integrity of the filesystem’s structure. The third affects the integrity of the data in the file. If the system crashed after the additional blocks were taken from the free-space area on the disk but before they were actually associated with the file, those blocks would become lost until some filesystem repair process noticed them. What we’d ideally want is for the entire transaction to be atomic so that when the system came back up, the file and metadata are consistent and either the append happened, or it didn’t (in the case of the journal entry associated with the append not making it to disk).
Filesystems may journal just the metadata or both the data and metadata. Journaling both the data and metadata is the most conservative route, but can come at a high performance penalty since the data must be written twice – once to the journal and then to the disk. However there is very little chance that files will have corrupt data in the event of an ungraceful shutdown since both the data and metadata will be consistent.
Journaling only the metadata guarantees that the structure of the filesystem is valid after an ungraceful shutdown. However the data in the files may not be valid, depending on when the data is committed to the drive. To see how this can happen, consider an application writing data to a file. As more data is written, the filesystem extends the file, allocating more space as needed. The file’s size and blocks that it uses are part of the metadata and are journaled. Even if the system were to shut down ungracefully, the file size and block allocated to the file are preserved in the journal and can be recovered by replaying the journal on restart. However, the data is not journaled and may be written to disk after the metadata is journaled. So what happens on an unclean shutdown?
If the filesystem ensures that all data is flushed to the disk before the journal is updated, then this is almost as good as journaling both the data and metadata. The system will come back up in a consistent state and files shouldn’t be corrupted. However, if the filesystem doesn’t ensure that data is flushed to the disk before the journal is updated, then it’s possible for the journaled metadata to refer to data that never got written. The filesystem structure will be fine after a crash, but the files may be corrupted – rather than the data that was supposed to be written, the file will contain whatever happened to be on the disk at the time. This may also pose a security concern if “whatever happened to be on the disk at the time” is sensitive information. Whoever has access to the file now has access to that information.
DVR Workload Simulation
To get an idea of how the filesystem – including metadata updates and journaling – affects I/Os, we’ll simulate a worst-case workload for a DVR. In addition to looking at access through the filesystem, we’ll also look at performance when the filesystem is bypassed by reading and writing to raw disk partitions.
Our simulated DVR simultaneously records eight shows and plays back two. Ten threads of I/O are created, with eight of the threads performing 1 MB writes to random locations in a file (or partition), and two threads performing 1 MB random reads from a file (or partition). The intent is to simulate a high degree of fragmentation in each file, such that seeking is required for each I/O. Each of the ten threads performs reads or writes in a tight loop, effectively hammering the filesystem.
For the purposes of characterizing performance, we will assume that each record is capable of buffering up to five seconds of writes and that playbacks read 2 MB at a time. What this means is that on the record side we care about the average access time when computed over a moving window that spans five seconds. The peak average will indicate the limits of what we are guaranteed. Similarly for playback, the average over two 1 MB reads is relevant, and twice the peak average is what the DVR playback will need to contend with.
A 1 MB I/O size (as opposed to 512 KB or 2 MB) was chosen since, with the hard drive chosen for this exercise, it can theoretically provide > 20 Mbit/s throughput for each of the record threads when a five second buffer is used, while also providing > 20 Mbit/s throughput for each of the playback threads. > 20 Mbit/s throughput is important as the ATSC MPTS bitrate is 19.4 Mbit/s, and it is possible for a single virtual channel to occupy the entire MPTS.
To obtain a close to worst-case seek pattern, the drive was divided into ten equal parts (either using partitions or large contiguous files). The first and last parts were allocated for playback (reads) and the middle eight for record (writes). The first and last parts correspond to the outermost and innermost parts of the drive, so satisfying the two streams of reads means full-stroke seeks. Likewise, the writes generate an access pattern spanning 80% of the drive surface.
For each disk area, an I/O thead was spawned which hammered the disk with 1 MB/s reads (for playback threads) or writes (for record threads). The l/O location was randomized within the disk area, so it is unlikely that two I/O from a particular thread were contiguous on disk. This randomization within each disk area combined with all threads running simultaneously means that at any given time there are read and write requests spanning the entire platter.
To measure the access times, all ten threads were started. After all ten threads indicated they were performing I/Os, they were told to start recording 2048 access time samples. Once a thread had collected 2048 samples it continued to run and submit I/O requests. Only after all threads had collected 2048 samples were the threads shut down.
The drive was prepared as follows:
- For the partition-based test, the drive was partitioned into ten 800 GB partitions spanning the entire disk.
- For the file-based test, the entire drive was formatted with ext4 -T largefile4 and ten 800 GB files were created on the drive.
- The files were created sequentially using fallocate, and roughly occupy the same locations on the drive as in the partition case.
- There should have been no fragmentation since the filesystem was freshly created.
- Random data was written to the playback files (otherwise no I/O would actually be performed and the filesystem would manufacture zeros as the read data.)
A shucked 8TB WDEMAZ drive was used for these tests. The WDEMAZ is a “white label” drive found in the WD EasyStore external drives. It’s generally comparable to the WD Red drives, and as we’ll see in the partition-based tests has excellent and consistent performance. While not as power efficient as the 2.5″ 3 TB Toshiba MQ03ABB3, the 3.5″ WDEMAZ has the higher performance and size to support a beefier DVR setup.
The ideal results we’d like to see are:
- Write fairness: Each of the eight record threads should all run with the same access times. One thread should not be starved at the expense of another.
- Read fairness: Each of the two playback threads should run with the same access times.
- Consistency. In an ideal world, all of the writes submitted by the record threads would have identical access times. Similarly all of the reads issues by the playback threads would have identical access times.The read and write access times may differ, and the ideal target for each depends on how much latency we are willing to incur for playback and how much buffer we are willing to set aside for record. However consistency in the read and write access times are important as the worst-case access times are what the system must be configured to handle, as well as to provide a predictable and consistent user experience.
Partition Test Results
First let’s take a look at the partition-based test. Here we bypass the file system and reads and writes are directed to the raw partitions.

Here we can see that the drive performs quite nicely. With 1 MB writes, the moving average access time over five seconds is very consistent at about 200 ms. Recall that we assume we have five seconds of media buffer to absorb variations in individual write access times. So what we care about is the five second moving average. What this chart tells us is that if we assume a moving average access time of 250 ms (allowing 50 ms of tolerance for good measure) and have a 5 second buffer, we should be able to sustain 32 Mbit/s per record. This meets ATSC’s 19.4 Mbit/s handily.
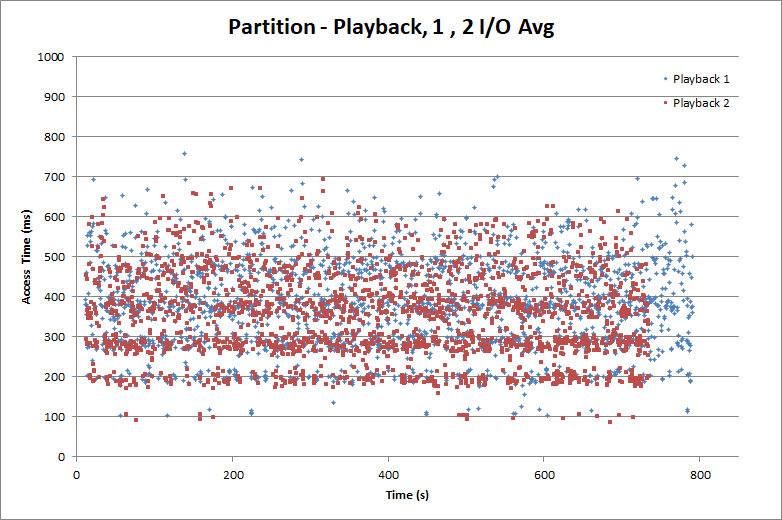
On the playback side, we’re more sensitive to the access times for individual reads. The worst-case access time dictates how much buffering (pre-rolling) we need before starting playback to prevent stalling. While we still use 1 MB I/Os, we are going to use the average access time over 2 MB. Why? We’re going to assume that for playback, the DVR software actually does 2 MB I/Os, but that the 2 MB I/O may be fragmented (into two fragments. The choice of two fragments is a bit arbitrary, and it is certainly possible to have worse fragmentation. However a well-implemented DVR can keep fragmentation low, so that even most 2 MB reads are contiguous.)
While the average read access time for 1 MB is about 400 ms, the worst case is around 750 ms. So to plan for 2 MB reads, we should have at least 1.5s of pre-rolled media. This isn’t bad and the delay is often hidden using various techniques so it doesn’t seem like you’re sitting there for couple seconds waiting for playback to commence.
There are a couple things to note here. First is that on playback, thread 2 finished slightly before thread 1. The discrepancy isn’t that large, but it is a bit unexpected and something to keep an eye on.
The second thing to note is that it took the playback threads about 800s to do 2048 1 MB reads, while the record threads did their 2048 writes in about half that time. This has to do with configuration of the deadline scheduler. With some tuning the read access times could be brought down at the expense of higher write access times, or vice-versa. We’ll dig into this further in a future post when we look at I/O schedulers.
ext4 Test Results
Now let’s take a look at what happens when we use ext4 with the default Centos 7 mount options.

Uh-oh. That nice constant access time we had for the partition-based record is gone and we have a number of spikes. While the average access time is about 350 ms, the worst is about 650ms. If we need to tolerate a 650 ms access time then we can only safely handle about 12 Mbit/s, which won’t cut it for many ATSC HD channels (let alone the full 19.4 Mbit/s available in the MPTS). So we would need quite a bit more buffering to accommodate the worst case. (The observant among you may notice that the higher access time come in spikes, and indeed they tend to be driven by single writes with unusually high access times.)

The playback side of things also aren’t as rosy. While for the most part access times are capped at around 500 ms, the occasional excursions to 1s and 1.3s also need to be handled. Quite a bit of preroll buffering will be required to handle these cases. The occasional bands of sub-200 ms access times are somewhat anomalous. (As we’ll see later, they disappear when we change journaling options. If anyone can explain what’s going on please drop me a note.)
Another anomaly which might not be as obvious is that the Playback 0 completed its iterations about twice as fast as the Playback 1 thread. It’s not immediately clear why this happened, but it is certainly not desirable. Given that both playback threads are issuing similar workloads, they should have completed at roughly the same time.
So what happened? To get an idea, let’s take a look at a couple of options we have when mounting an ext4 filesystem.
Reducing ext4 inode updates
First let’s look at the “relatime” and “noatime” options. As noted earlier, even reading a file ends up generating writes to the drive since the file’s access time needs to be updated. This degrades both playback and recording. The ext4 “relatime” option causes a file’s access time to be updated only if it is earlier than the file’s modification or creation time, or if the access time is more than a day old. (The access time is also updated if the inode is dirty and would need to be written anyway).
The “noatime” option prevents the access time from being updated under any circumstances. That’s fine for our media files. So where does that get us?
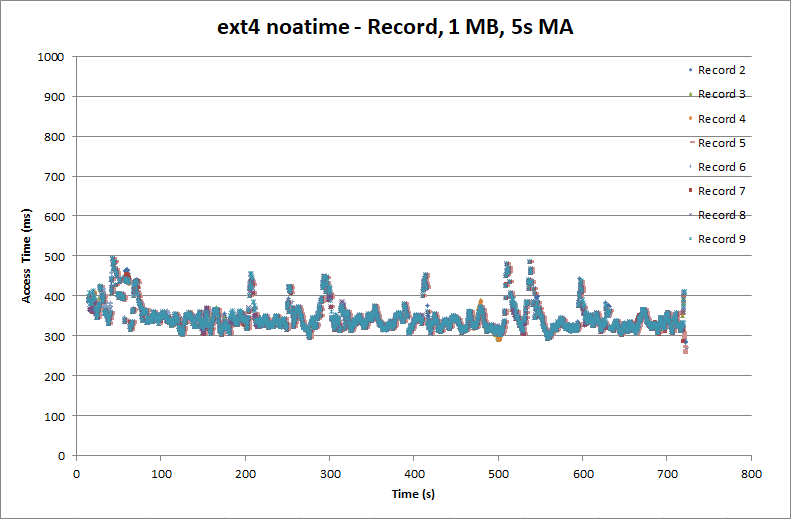
Things look slightly better, but there are still peaks approaching 500 ms while the average remains around 350 ms.

On the playback side we still have a peak access time of about 900 ms, and the odd sub-200 ms access times. And again the playback 0 thread ran about twice as quickly as the playback 1 thread.
ext4 Data Writeback Mode
Second let’s take a look at how journaling is handled. By default (at least in Centos 7), ext4 uses Ordered Mode. Ordered Mode ensure that data is committed to the disk before the journal is updated. If the system were to crash, then the file would still be consistent.
An alternative ext4 journaling mode is Writeback Mode. In Writeback Mode the journal entry may be updated before the data is committed. As noted above, this could result in corrupt data in files and allow sensitive information to be leaked.
In the case of our DVR, Writeback Mode is fine for our media data. Our DVR software can handle a bit of corruption of the recording file’s structure, and we can handle playing a bit of garbage. (The system drive on the other hand should probably use Ordered Mode to ensure that databases and other items remain consistent.

Things are looking a bit better on the record side with Writeback Mode. The access times are much more linear, although there are a couple peaks above 400 ms.

The playback front now looks a bit more like the raw partition I/O pattern, and both playback threads are running at roughly the same rate. It’s not clear why Ordered Mode would cause the anomalous behavior we saw earlier. It may have to do with write barriers ensuring that the data was flushed to the drive before the journal was updated interacting with the deadline I/O scheduler.
Managing Metadata and Data Syncs
As a last tweak to ext4, let’s see if we can get the access times even more linear. We might be able to do that by managing how frequently metadata (and data) is flushed to the disk. The default is 5s, which means a flurry of writes can occur every 5s. We may get more predictable performance by reducing the interval to 1s in the hopes of taking more frequent but smaller bites.
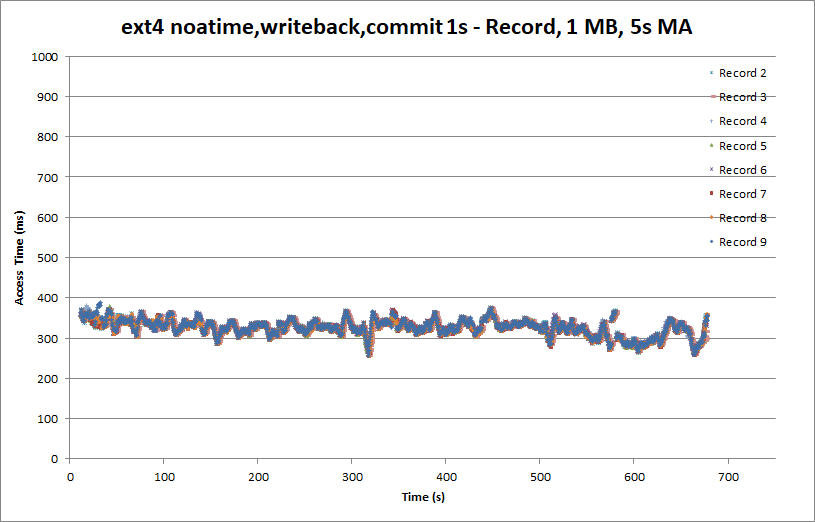
It looks like we’ve managed to get rid of the 400 ms peaks. While still not quite as linear as the raw partition access, this is a substantial improvement over the initial ext4 results and something we can work with. Still, with a peak access time of just under 400 ms, we can sustain a hair over 20 Mbits, which is uncomfortably close to the ATSC 19.4 Mbit/s rate.
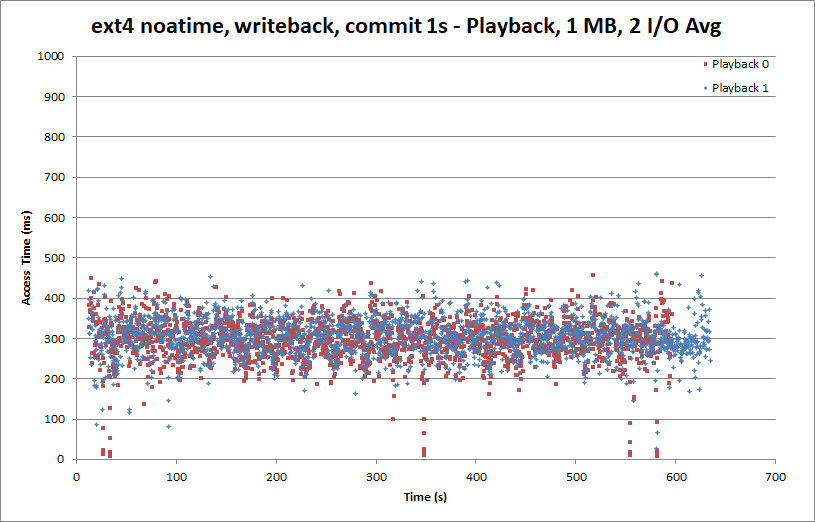
The playback side is largely unchanged.
The observant among you may have noticed that our average playback acesss time is lower than for the raw partition, while our average write access time is higher than with the raw partition. There are likely two factors contributing to this. The first is that throughout these tests, the same deadline I/O scheduler parameters were used. These parameters can be tuned to move read and write latencies around. As we’ve changed the pattern of reads and writes (by changing the metadata and journaling options) but not adjusted the deadline scheduler, the latencies have moved instead.
Second is that the filesystem overhead (updating inodes and the free space map, for example) eats into the overall record and playback performance.
By tuning the deadline scheduler, we could lower the write access times a bit at the expense of increased playback access times. If we were to do that, we’d probably see the write access time has taken a 50-100ms hit. That would give us some headroom to hit eight full-bitrate ATSC records and two playbacks.
xfs Test Results
While the ext series of filesystems has been the default on Linux for some time, xfs is gaining in popularity. xfs has realtime subvolume options, but as a a first look let’s just use a standard xfs partition with the default options.

The record side looks quite good out of the box, equivalent to or perhaps slightly better than ext4.
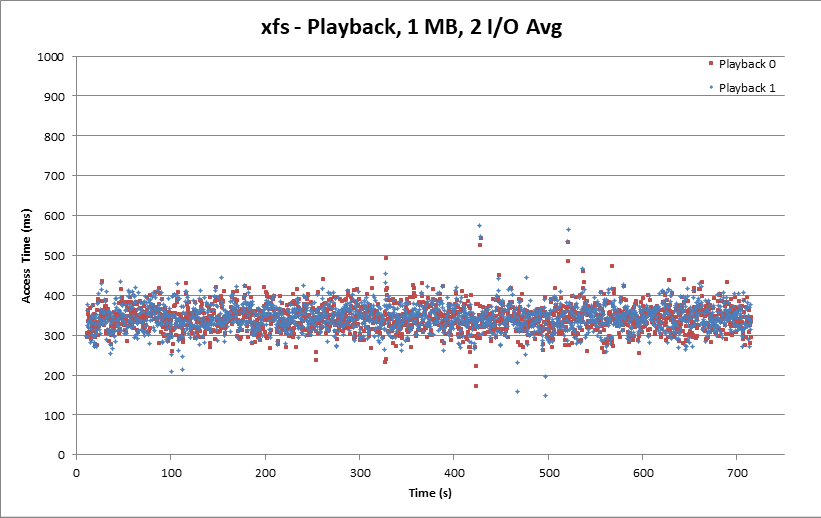
The playback side appears better than ext4, with good clustering around 350 ms and peaks constrained below 600 ms.
As with the optimized ext4 case, some tweaking of the deadline scheduler might gain us a bit of headroom on the record side at the expense of some playback latency.
While Project Entangle has used ext4 for its media drives, I’ll need to give xfs a hard look.